Node protection using MPLS-TE Fast ReRoute
In this post i would like to demonstrate the concept of a well known MPLS TE (Traffic Engineering) feature, known as Fast Reroute.
Fast Reroute, as the name implies, is used to create an MPLS network, that has similar convergence properties of SONET/SDH APS of about 50 ms.
Obviously, such aggressive convergence times are needed primarily in Service Provider networks or institutions with very high demands. For example financial institutions.
Without Fast Reroute, we would need to wait on the IGP to converge before being able to forward packets. Even with very aggressive tuning of the IGP, this is still way slower than SONET/SDH APS.
For example, tuning OSPF to a 1 second dead-interval, this is still 20 times slower.
So the concept of Fast Reroute is to establish a primary tunnel for your traffic, which is the path you want it to take in a normal situation. You then “protect” this path by a backup tunnel that takes a different path.
Now there’s two types of Fast Reroute (nothing is ever simple right?). Namely Link-Protection and Node-Protection.
Link-Protection protects a single link from failure and reconverges on the other “side” of the link. The data path with Link-Protection re-establish at the same router, but through a different path.
Node-Protection protects against the failure of an entire router. The data re-establish at the “next next-hop”, which is the router one step further down than the failed router (or the node you are protecting).
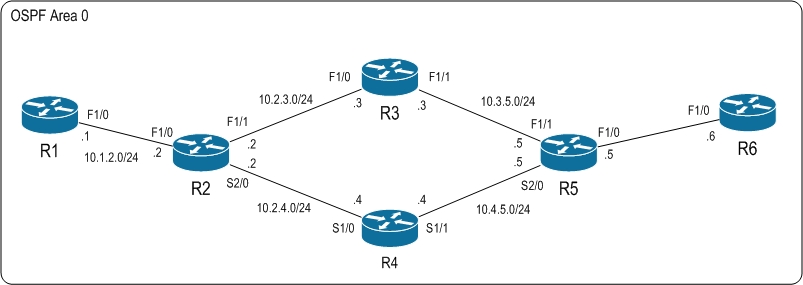
So take a look at our topology used to demonstrate Fast Reroute (FRR) Node-Protection.
As can be seen, we are running a simple OSPF topology where all routers are in the backbone area 0.
Following normal OSPF convergence rules, the path from R1’s loopback0 (1.1.1.1) to R6’s loopback0 (6.6.6.6) will go from R1 to R2 -> R3 -> R5 -> R6, because the alternative has slower links (serial).
I have enabled MPLS on R2, R3, R4 and R5. R1 and R6 has no MPLS knowledge and simply forwards ordinary IP packets.
What I want to demonstrate is the Node-Protection feature. To do this, i will protect router R3 through Fast Reroute.
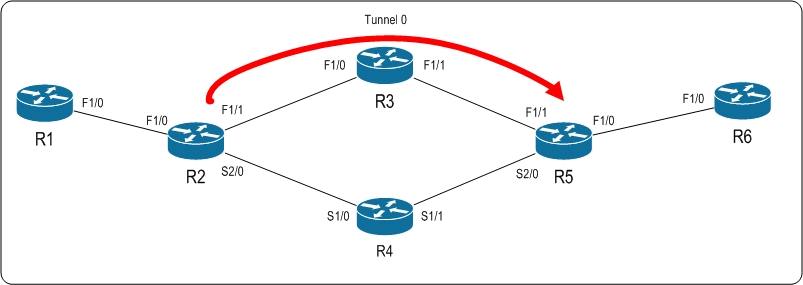
In order to get Node-Protection we need to create a tunnel going from R2 -> R3 -> R5.
This will be my prefered data path and one i expect all data toward R6’s loopback0 will take comming from R1. (Or R2 for that matter).
Lets verify this behavior before starting with the TE part:
R1#traceroute 6.6.6.6 so loo0
Type escape sequence to abort.
Tracing the route to 6.6.6.6
1 10.1.2.2 112 msec 16 msec 20 msec
2 10.2.3.3 [MPLS: Label 300 Exp 0] 56 msec 68 msec 76 msec
3 10.3.5.5 [MPLS: Label 505 Exp 0] 76 msec 72 msec 72 msec
4 10.5.6.6 76 msec * 48 msec
Alright, so the data is taking the path that we expect under normal circumstances.
Now lets create the primary tunnel, which will be Tunnel0 on R2:
First off, the explicit path definition to force R2 to go through R3 and to R5:
R2(config)#ip explicit-path name PRIMARY enable
R2(cfg-ip-expl-path)# next-address 10.2.3.3
Explicit Path name PRIMARY:
1: next-address 10.2.3.3
R2(cfg-ip-expl-path)# next-address 10.3.5.5
Explicit Path name PRIMARY:
1: next-address 10.2.3.3
2: next-address 10.3.5.5
Next is the tunnel itself:
R2(config)#interface Tunnel0
R2(config-if)# ip unnumbered Loopback0
R2(config-if)# tunnel destination 5.5.5.5
R2(config-if)# tunnel mode mpls traffic-eng
R2(config-if)# tunnel mpls traffic-eng autoroute announce
R2(config-if)# tunnel mpls traffic-eng path-option 10 explicit name PRIMARY
R2(config-if)# tunnel mpls traffic-eng fast-reroute
R2(config-if)#end
We will now have a tunnel like this:
We tell the tunnel to goto 5.5.5.5 which is R5’s loopback interface.
We also specify that we want autoroute announce. What this does is to modify the OSPF selection to prefer path’s “behind” and on R5 through the tunnel interface. Instead we could have created a static route pointing toward the tunnel interface when going to 6.6.6.6.
Its also worth pointing out that we tell this tunnel to request Fast Reroute capabilities. This will tie a backup path into this tunnel interface.
After the the tunnel has been defined, we should see it comming up and we can verify it:
R2#sh mpls traffic-eng tunnels tun0
Name: R2_t0 (Tunnel0) Destination: 5.5.5.5
Status:
Admin: up Oper: up Path: valid Signalling: connected
path option 10, type explicit PRIMARY (Basis for Setup, path weight 2)
Config Parameters:
Bandwidth: 0 kbps (Global) Priority: 7 7 Affinity: 0x0/0xFFFF
Metric Type: TE (default)
AutoRoute: enabled LockDown: disabled Loadshare: 0 bw-based
auto-bw: disabled
Active Path Option Parameters:
State: explicit path option 10 is active
BandwidthOverride: disabled LockDown: disabled Verbatim: disabled
InLabel : –
OutLabel : FastEthernet1/1, 309
RSVP Signalling Info:
Src 2.2.2.2, Dst 5.5.5.5, Tun_Id 0, Tun_Instance 1
RSVP Path Info:
My Address: 10.2.3.2
Explicit Route: 10.2.3.3 10.3.5.3 10.3.5.5 5.5.5.5
Record Route: NONE
Tspec: ave rate=0 kbits, burst=1000 bytes, peak rate=0 kbits
RSVP Resv Info:
Record Route: 3.3.3.3(309) 5.5.5.5(0)
Fspec: ave rate=0 kbits, burst=1000 bytes, peak rate=0 kbits
Shortest Unconstrained Path Info:
Path Weight: 2 (TE)
Explicit Route: 10.2.3.2 10.2.3.3 10.3.5.3 10.3.5.5
5.5.5.5
History:
Tunnel:
Time since created: 3 minutes, 26 seconds
Time since path change: 1 minutes, 14 seconds
Number of LSP IDs (Tun_Instances) used: 1
Current LSP:
Uptime: 1 minutes, 14 seconds
and since we are using Auto Route, we should see that we will be using the tunnel interface to goto networks “behind” R5:
R2#sh ip route | incl Tunnel0
O 5.5.5.5 [110/3] via 5.5.5.5, 00:03:40, Tunnel0
O 6.6.6.6 [110/4] via 5.5.5.5, 00:03:40, Tunnel0
O 10.4.5.0/24 [110/66] via 5.5.5.5, 00:03:40, Tunnel0
O 10.5.6.0/24 [110/3] via 5.5.5.5, 00:03:40, Tunnel0
Which we can see we are. Lets further verify it by looking at the LFIB:
R2#sh mpls forwarding-table
Local Outgoing Prefix Bytes Label Outgoing Next Hop
Label Label or VC or Tunnel Id Switched interface
200 Pop Label [T] 5.5.5.5/32 0 Tu0 point2point
201 Pop Label 4.4.4.4/32 0 Se2/0 point2point
202 No Label [T] 10.5.6.0/24 0 Tu0 point2point
203 No Label [T] 10.4.5.0/24 0 Tu0 point2point
204 Pop Label 10.3.5.0/24 0 Fa1/1 10.2.3.3
205 No Label 1.1.1.1/32 3360 Fa1/0 10.1.2.1
206 No Label [T] 6.6.6.6/32 0 Tu0 point2point
207 Pop Label 3.3.3.3/32 0 Fa1/1 10.2.3.3
[T] Forwarding through a LSP tunnel.
View additional labelling info with the ‘detail’ option
On R3, we can also verify that a new label has been generated for the tunnel:
R3#sh mpls forwarding-table
Local Outgoing Prefix Bytes Label Outgoing Next Hop
Label Label or VC or Tunnel Id Switched interface
300 505 6.6.6.6/32 768 Fa1/1 10.3.5.5
301 Pop Label 5.5.5.5/32 152 Fa1/1 10.3.5.5
302 201 4.4.4.4/32 0 Fa1/0 10.2.3.2
500 4.4.4.4/32 0 Fa1/1 10.3.5.5
303 Pop Label 2.2.2.2/32 0 Fa1/0 10.2.3.2
304 205 1.1.1.1/32 780 Fa1/0 10.2.3.2
305 Pop Label 10.4.5.0/24 0 Fa1/1 10.3.5.5
306 Pop Label 10.2.4.0/24 0 Fa1/0 10.2.3.2
307 Pop Label 10.1.2.0/24 0 Fa1/0 10.2.3.2
308 Pop Label 10.5.6.0/24 0 Fa1/1 10.3.5.5
309 Pop Label 2.2.2.2 0 1 5496 Fa1/1 10.3.5.5
The label 309 with the prefix of 2.2.2.2 indicates the tunnel that is built and 2.2.2.2 is the headend.
If we now run a traceroute from R1, we should see it using different labels than before:
R1#traceroute 6.6.6.6 so loo0
Type escape sequence to abort.
Tracing the route to 6.6.6.6
1 10.1.2.2 24 msec 16 msec 20 msec
2 10.2.3.3 [MPLS: Label 309 Exp 0] 60 msec 52 msec 60 msec
3 10.3.5.5 56 msec 52 msec 56 msec
4 10.5.6.6 60 msec * 80 msec
As we expected, the 309 label is used and hence the tunnel interface is in action.
In order for the protection to work, we must define a backup path.
First off, define the path that we will take:
R2(config)#no ip explicit-path name SECONDARY enable
R2(config)#ip explicit-path name SECONDARY enable
R2(cfg-ip-expl-path)# next-address 10.2.4.4
Explicit Path name SECONDARY:
1: next-address 10.2.4.4
R2(cfg-ip-expl-path)# next-address 10.4.5.5
Explicit Path name SECONDARY:
1: next-address 10.2.4.4
2: next-address 10.4.5.5
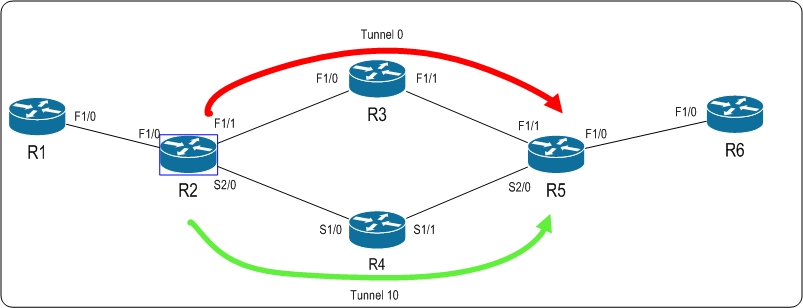
This is going from R2 -> R4 -> R5.
Lets define the backup tunnel now:
R2(config)#interface Tunnel10
R2(config-if)# ip unnumbered Loopback0
R2(config-if)# tunnel destination 5.5.5.5
R2(config-if)# tunnel mode mpls traffic-eng
R2(config-if)# tunnel mpls traffic-eng path-option 10 explicit name SECONDARY
And lastly we will apply it to the interface facing the node that we want to protect:
R2(config-if)#int f1/1
R2(config-if)#mpls traffic-eng backup-path tunnel 10
We can verify that our backup tunnel is in effect (not being active yet though):
R2#sh mpls traffic-eng fast-reroute database
Headend frr information:
Protected tunnel In-label Out intf/label FRR intf/label Status
Tunnel0 Tun hd Fa1/1:309 Tu10:implicit-nu ready
LSP midpoint frr information:
LSP identifier In-label Out intf/label FRR intf/label Status
The topology now looks like this, with the green tunnel being the backup tunnel:
Now, its important to know that MPLS TE tunnels are a one way street. This means that our protection is one way as well.
If we wanted to polish off our design, we should create the same configuration on R5 going to R2.
Instead i will “cheat” a bit. I am using Policy Based Routing (PBR) on R5, to force all packets to go through R5 -> R4 -> R2.
This is the configuration i am using on R5 on the interface toward R6:
interface FastEthernet1/0
ip address 10.5.6.5 255.255.255.0
ip policy route-map PBR
speed auto
duplex auto
end
Where the route-map PBR is defined as:
R5#sh route-map
route-map PBR, permit, sequence 10
Match clauses:
Set clauses:
ip next-hop 10.4.5.4
The final step before we can test this configuration out, is to put in place some feature that will alert R2 to the failure of R5. BFD (Bidirectional Forwarding Detection) could be used (and probably would be), but here im using RSVP hello messages instead.
Both globally and on the interface toward R3 and R2 respectively (on R2 and R3):
R2(config)#ip rsvp signal hello
R2(config)#int f1/1
R2(config-if)#ip rsvp signal hello
and R3:
R3(config)#ip rsvp signal hello
R3(config)#int f1/0
R3(config-if)#ip rsvp signal hello
Verify on R2:
R2#sh ip rsvp hello instance detail
Neighbor 10.2.3.3 (router ID: 3.3.3.3) Source 10.2.3.2
Type: Active (sending requests)
I/F: FastEthernet1/1
State: Up (Since: 2012 September Saturday 01 10:09:31 )
Clients: Fast Reroute
LSPs protecting: 1
Missed acks: 4, IP DSCP: 0x30
Refresh Interval (msec)
Configured: 200
Statistics: (from 2855 samples)
Min: 200
Max: 256
Average: 200
Waverage: 200 (Weight = 0.8)
Current: 200
Last sent Src_instance: 0xB530DC54
Last recv nbr’s Src_instance: 0xDE1DAADB
Counters:
Communication with neighbor lost:
Num times: 0
Reasons:
Missed acks: 0
Bad Src_Inst received: 0
Bad Dst_Inst received: 0
I/F went down: 0
Neighbor disabled Hello: 0
Msgs Received: 3241
Sent: 3241
Suppressed: 0
Now on R1 we start an ICMP ping from R1’s loopback0 to R6’s loopback0 and in the meantime i will reboot R3:
And immediately on R2 we see:
R2#sh mpls traffic-eng fast-reroute database
Headend frr information:
Protected tunnel In-label Out intf/label FRR intf/label Status
Tunnel0 Tun hd Fa1/1:309 Tu10:implicit-nu active
LSP midpoint frr information:
LSP identifier In-label Out intf/label FRR intf/label Status
where the Fast Reroute backup tunnel is now in active state.
Excellent! we just protected against an entire router crash using just MPLS and a bit of Traffic Engineering.
Notice that only after 40 seconds does OSPF start converging:
*Sep 1 10:34:41.523: %OSPF-5-ADJCHG: Process 1, Nbr 3.3.3.3 on FastEthernet1/1 from FULL to DOWN, Neighbor Down: Dead timer expired
Its important to emphasize that everything rest on how fast you determine that your next hop is unavailable. In the real world you would probably be using BFD with pretty aggressive timer values.
So this small example demonstrate the fact that by using a relatively simple configuration you can achieve something similar to SONET/SDH APS convergence time on a packet based network using MPLS.
I hope this have been helpful. Take care!


